Appendix 1- The GFM Jib
The GF-MULTI JIB is a professional, lightweight and modular Jib arm, suitable for carrying all general remote head systems. It is portable, mobile and mounts on most standard dollies fitted with Euro-adapter or Mitchell mounts.
Appendix 2- About GFM
At the GFM factory great pride is taken in the high standard of manufacturing. Here our team of highly skilled and experienced engineers, machinists and technicians, each with a dedication to excellence, work towards the final product.
Our mission is to develop and produce camera support equipment that is innovative, effective and of the highest quality. Our focus and philosophy on building superior equipment, combined with a dedication and commitment to customer service and satisfaction, has grown throughout the years. We place a high value on long term relationships with clients, suppliers and all those working in the field.
Appendix 2A- MōVI Controller MIMIC Mode Instructions
MIMIC Mode (Beta)
MIMIC Mode allows for intuitive control of the MōVI pan, tilt, and (optionally) roll by physically moving the MōVI Controller. Mount the MōVI Controller to a fluid head tripod for smooth pan bar-like control, or move it in your hands for dynamic yet stable operation.
Sensor Start-up and Re-zero.
MIMIC Mode uses sensors in the MōVI Controller to measure its movement. These sensors are calibrated each time the MōVI Controller is turned on. The start-up calibration takes approximately five seconds. The MōVI Controller should be kept level and still during this time.
If the MōVI Controller was moving during start-up, or if one or more axes drift while using MIMIC Mode, the sensors can be re-zeroed at any time using from the Tx Config menu by selecting Tx Action: Re-zero and pressing the Menu Set button.
Axis Scaling and roll enable/disable
MIMIC Mode can translate MōVI Controller movement to the MōVI directly (1:1) or it can scale the movement on each axis. Use the Mimic Axis Scale values for Roll, Tilt, and Pan to adjust this behavior. Some examples:
- Roll is disabled by default (Mimic Roll Scale: 0.0). To enable the roll axis with a direct ratio of 1:1, set the Mimic Roll Scale value 1.0.
- Pan and Tilt Scale are set to 1.0 by default, but if the MōVI Controller is mounted on a fluid head tripod, it may be advantageous to use a higher Scale.
Appendix 3- KAMFILM
At KAMFILM we aim to amplify your online presence to help you attract attention in an oversaturated market. We offer a variety of videography and editing services to help both business and personal brands advertise their identity and products. We do this alongside making our own original content. Our production company consists of young and talented individuals who eat, sleep and drink new ideas in order to create imaginative content tailored to your specific needs.
KAMFILM’s goal has always been creating opportunities for young people from a range of ethnic backgrounds in the media industry producing unique and high-quality content. Individuals from BAME backgrounds are currently underrepresented in the UK media industry on both on screen and behind the scenes production. Media companies are struggling to meet their own diversity and inclusion policies. With this in mind, KAMFILM will generate new opportunities that help nurture young talent across the UK to develop their skills, and confidence to pursue a career in media production.
Appendix 4- The Shot List
Your shot list is essentially the blueprints for the visual structure and photography of the film. It contains the “raw materials” that you need to compose the film photographically. An architect would never consider building a structure without blueprints. A director or cinematographer should also never consider creating a film without their shot list.
When creating a shot list, the director of the film will sit down with the cinematographer and discuss their vision for the film. While poring over the script’s pages, the director and cinematographer will collaborate and discuss which shots will best convey the emotion of the film. Once the director and DP agree upon a shot for a scene, they will then list it in the shot list.
What’s in a Shot List?
In a simple sense, a shot list will contain the scene number, followed by the shot number. This makes it easier to coordinate where a given scene appears in the course of the project — you’ll even see this info written on the camera slate.
Followed by the scene and shot number will be the shot size. For example: is the shot a medium or a wide shot? Conversations between the director and the DP will clarify what type of shot will best tell the story and help orient the audience.
Other details include;
- Camera Movment– A key component in a shot list is identifying how exactly the camera will move throughout the shot.
- Lens Selection– Personally, I always love to include potential lens focal length for a scene. It helps me quickly recall the mood and tone that I’m going for in the scene. Also, pre-selecting a lens helps move things along more quickly on set.
- Note & Descriptions– I always include detailed notes about the shot, the emotion it’s trying to convey, and what part of the story it tells. It’s basically a quick explanation of why you’re getting this shot in the first place. Having this information ready on a fast-paced set is invaluable.
Appendix 4A- Set Etiquette, The Camera Assistant
Rule #2, “stay in your own department!” is also an important concept. It is a natural tendency to want to help out fellow crewmembers, but 90 percent of the time, other department do not need or want the help. Responsibilities on the film set are very specifically assigned, and the members of the various departments take great pride in being able to do their own job without help from the” outsiders”. It is also possible to make things worse by trying to help. There may be factors unknown to you that you may be upsetting.
For example, the table that is in your way on the set may be an antique that falls apart when moved improperly. Wait for the Prop Department to move furniture out of the way.
Appendix 5- Guerilla Filming
To make guerilla film making practicable and to avoid legal proceedings experts suggests:
As small crew as possible– As big crew draws unwanted attention very easily, it is desirable to have a skeleton crew of 2-3 people maximum.
Use of small palm fitting digital cameras- The smaller the camera it is, the less likely that the crew will get caught, so, use of palm fitting digital camera (DSLR) instead of bulky movie camera is one of the keys to successfully accomplish guerilla film making without attracting mass attention.
Avoid using boom mics and go wireless- Boom mics are the biggest giveaways of guerilla shoot, as nothing attracts more attention than this in a shoot.
No gears in plain sight– It’s better not to use even a tripod and go handheld in this type of shoots.
Pre-planning and quick action- The best way to properly execute a guerilla shoot is to plan as diligently as possible and rehearse in some other locations as this makes the process much swift and easy.
Appendix 6- Robert Hardy, No Film School
It’s hard to argue with the lists released after every major festival and awards show that detail which cameras were used on the films. Without fail, the higher budget films are almost always shot on Alexa, with some occasional love for Sony and RED cameras, as well as film.
Of course, image quality, both in terms of dynamic range and color reproduction, is at the top of the list of reasons for the Alexa’s dominance. However, I firmly believe that the last reason in that video, the reliability and intuitiveness, are the driving forces behind why cinematographers (and producers) continually choose these cameras project after project.
When you combine the fact that the Alexa is dead simple to learn and operate (at least compared to several competitors) with the fact that these cameras are built like tanks and steadfastly reliable, and then you throw in the superb image quality, it’s no wonder why people return to the Alexa time and time again.
Appendix 7- Sony a7S II v ARRI Alexa Mini
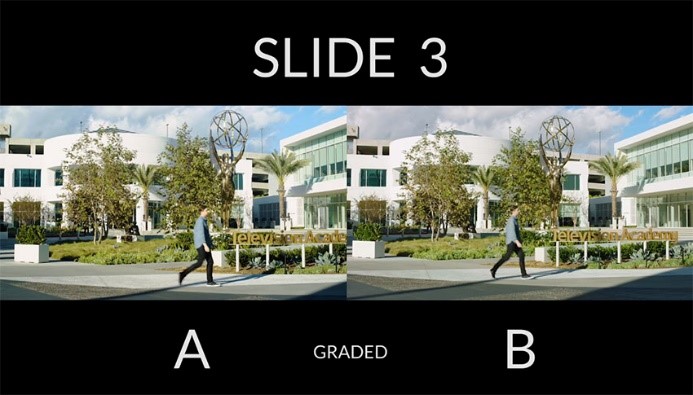
A= Sony a7S
B= ARRI Alexa Mini
At first glance, most people can barely notice a difference between the two shots. From colors to sharpness and even dynamic range, most wouldn’t be able to spot any significant discrepancies between the footage captured by the cameras.
Despite the similarities between the shots, however, there are some subtle differences that can be easily spotted by anyone with a trained eye. For example, if you look in Slides 1 and 3, the Alexa Mini was able to retain just a few more details in the highlights, attributed to its slightly higher dynamic range.
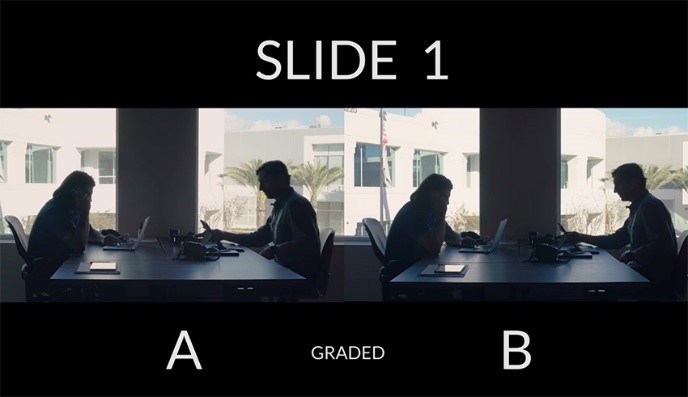
Speaking of which, you will also notice that the Alexa Mini has a flatter image, which allows for softer highlights and detailed shadows. Lastly, the colors of the Alexa Mini seem to be more true-to-life whereas the A7S II footage is slightly tinted too much with a green color, an infamous attribute found in Sony cameras.

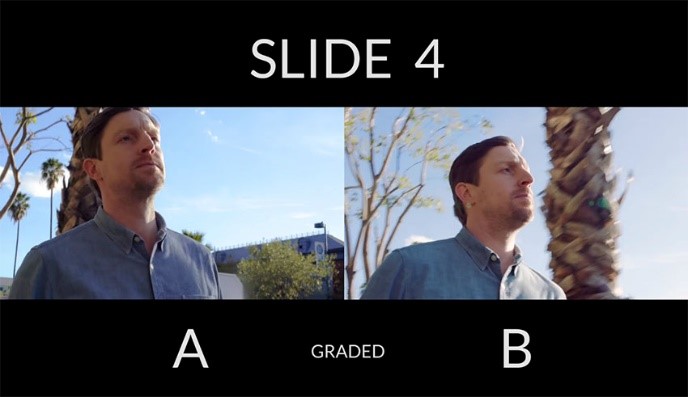
In the end, it should be no surprise that the Alexa Mini beats the A7S II in image quality alongside many other aspects, hands down. As always, the point of this comparison is not to outline which camera is better, but rather aims to show how close you can get the A7S II footage (or any other camera in this price range) to match shots from the unrivaled Alexa Mini, proving that you don’t need a $50,000+ camera to produce beautiful cinematic images.
Appendix 8- Distraction to actors and directors- The Camera Assistant Manual
If temperamental or nervous actors are doing intimate things, the best advice for a camera assistant is to be invisible and silent. The best assistants are those who can do heir job jobs quietly and effectively. Without fuss or fanfare. They get their focus marks with a minimum of dialogue, they reload quickly, change lenses quality, etc., with a minimum of bother and distraction.
It is vital that the actions and movements of the Camera Assistant should not distract the actors from their performances. All too often the Camera Assistants the crew member most likely to be in the actor’s line of sight.
Any rapid of jerky motions by the camera Assistant in that position might be very distracting to the performers. The Assistants can usually figure out very early in the shoot which actors are the most likely spooked, and should tread lightly when shooting a scene with those actors.
Appendix 9- Frame Rates by W. Ashley Maddox
One of the most exciting things about Sony’s new FS7 is the high frame rate options it has. Recording internally, it will shoot a top speed of 60FPS in Ultra High Definition (3840P) and 180 FPS in High Definition (1080P).
The FS7 isn’t without its quirks though; while filming with the XAVC-I (Intra Frame) codec you can get the full 180 FPS, but when filming in XAVC-L (Long GOP) you can only get 120 FPS.
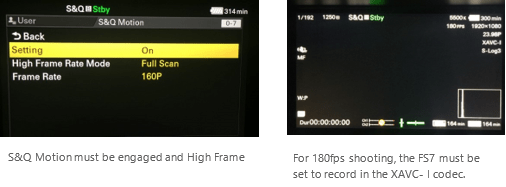
To get the highest frame rate possible I set the codec to XAVC-I and the Rec Format is set to 1920 24P. I enable the high frame rate recording by using its Slow and Quick (S&Q) feature. Pushing the S&Q button on the side of the camera turns the setting on and by default the camera automatically sets itself to 60P mode. In this standard S&Q mode you can shoot anywhere from 1 to 60 fps.
Appendix 10- Speed Booster
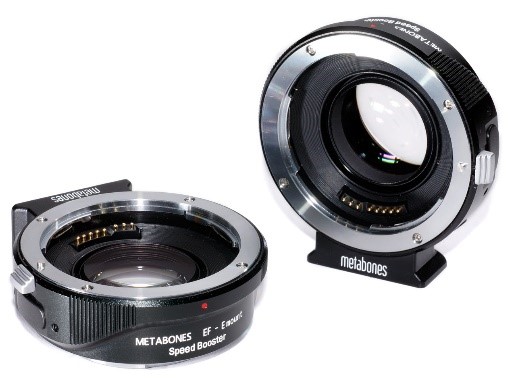
The 3 main features regarding the speed booster are;
-Increase maximum aperture by 1 stop.
-Increase MTF.
-Makes lens 0.71x wider.
Like the revolutionary original Metabones Speed Booster announced in January 2013, the Speed Booster ULTRA has a magnification of 0.71x, and so it effectively reduces the crop factor of mirrorless cameras with DX-sized sensors, such as Sony E-mount and Fuji X-mount cameras, from 1.5x to 1.07x.
DP review.com
Firstly, Metabones claims that by reducing the image magnification, the Speed Booster gives an overall focal length multiplier of around 1.09x, promising a nearly full frame field of view on APS-C. The second claim, as its name implies, is that the Speed Booster increases the lens’s speed by a stop, turning an F2.8 full frame lens into an F2.0 optic that allows for low light shooting at a lower ISO sensitivity.
How can an adapter change the focal length and aperture of a lens?
The Speed Booster is most easily understood as being the opposite of a teleconverter – in that it reduces your focal length. This, then, has a domino effect on the F-number of the lens. Because the F-number is the focal length divided by the width of the entrance pupil, reducing the focal length without changing the entrance pupil increases the F-number. So, adding the speed booster to a 50mm F1.4 lens turns it into a 35.5mm F1.0.
An Example…
As you can see from the examples below, Metabones’ claim of ‘almost full-frame coverage’ is no idle boast. We’ve shot our resolution chart using the same lens on both the NEX-6 with Speed Booster adapter, and the EOS 6D; each camera was shot with its sensor plane located the same distance from the resolution chart. Based on our image comparisons, we calculated a focal length multiplier of about 1.07x, which is virtually identical to the company’s assertions.
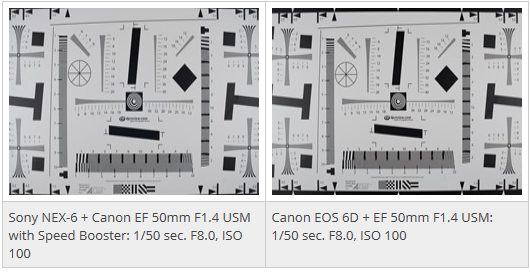
The Speed Booster combines with the Sony NEX-6 to provide a slightly narrower field of view compared to the full-frame Canon EOS 6D. The raw files were processed in ACR 7.3 beta to match white balance and brightness, with all other settings, including sharpening at their defaults.
Appendix 10A- GloCast Multi Camera Set Up
Using multiple cameras makes your film look dynamic and interesting with higher quality production values. When an event is filmed with multiple cameras, we will be able to choose the best footage from a number of angles – particularly important if the event has a lively Q&A session or fast paced debate. Essentially, the more cameras we can use, the better your film will be.
Naturally, as we add cameras, the cost tends to go up slightly as both crew and kit increase in addition to the time required in the edit suite but the benefits outweigh the additional cost. For live streams, you can have up to 4 HD cameras and an additional live high quality feed from the PowerPoint or Keynote presentations. For footage edited in the edit suite, we can use unlimited sources. The most common setups are explained below:
1 Camera (1 operator)
– Basic budget option
– All camera movement and zooms will be visible
– Static in nature.
– The framing will be medium with almost the whole body visible.
2 Cameras (1-2 operators)
– Wide shot and a tighter speaker shot. We can cut out any zooms, focus pulls and camera movement in the edit or live mix.
– Wide shot is a safety shot and can be locked off (unmanned), allowing the camera man to be mobile and to capture multiple angles. This can make the film look like a 3 camera shoot.
– We often use a DSLR for the manned camera for a more filmic result.
3 Cameras (2-3 operators)
– One camera will usually be locked off on a wide establishing shot. This will be our safety shot in case both cameras are zooming or focusing at the same time.
– The second camera will be manned on a medium shot. For instance, this could be of the top table.
– The third camera is usually at the front of the room, allowing us to capture audience from the front as they ask questions in addition to capturing tighter speaker shots and angles of the panel.
